Let’s Encrypt is a free and open certificate authority managed by a public benefit organization called ISRG which concentrates on the security communication over the Internet. There are many technology companies like Mozilla, Akamai, EFF, Cisco, IdenTrust, Facebook, etc are sponsors and the platinum sponsors have a seat in their Technical Advisory Board.
It uses Automated Certificate Management Environment (ACME) protocol to enable communication between the certification authority and the web server to which the certificate is issued. Let’s encrypt uses ACME to validate the domain Server Name Indication. ACME protocol has been submitted as draft to IETF for formal approval process to be an RFC.
Starting October 2015 Let’s Encrypt intermediate certificates are cross signed by IdenTrust hence all the certificates signed by Let’s Encrypt are trusted by major browsers. It moved from private beta to public beta on 3rd December 2015.
Currently it works only on *nix operating systems that include Python 2.6 / 2.7 and it requires root access. I tried it on Amazon Linux instance and it worked like a charm in few easy steps.
Clone the letsencrypt repository from github
$ git clone https://github.com/letsencrypt/letsencrypt
Cloning into 'letsencrypt'...
remote: Counting objects: 26694, done.
remote: Total 26694 (delta 0), reused 0 (delta 0), pack-reused 26694
Receiving objects: 100% (26694/26694), 6.91 MiB | 4.63 MiB/s, done.
Resolving deltas: 100% (18788/18788), done.
Checking connectivity... done.
$ cd letsencrypt
Create a configuration file with the requirements
# cat /opt/letsencrypt.ini
# This is an example of the kind of things you can do in a configuration file.
# Use a 4096 bit RSA key instead of 2048
rsa-key-size = 4096

# Uncomment and update to register with the specified e-mail address
email = <Email Address>

# Uncomment and update to generate certificates for the specified domains.
domains = demo.letsencrypt.

# Uncomment to use the standalone authenticator on port 443
authenticator = standalone
standalone-supported-challenges = tls-sni-01
Execute letsencrypt-auto with –debug option since Amazon Linux is currently not fully supported and pass the configuration files as the argument. It will download all the dependencies and generate the certificate.
$ ./letsencrypt-auto certonly --standalone -c /opt/letsencrypt.ini -debug
Bootstrapping dependencies for Amazon Linux...
.
.
.
Creating virtual environment...
Updating letsencrypt and virtual environment dependencies.......
Running with virtualenv: /root/.local/share/letsencrypt/bin/letsencrypt certonly --standalone -c /opt/letsencrypt.ini --debug
Version: 1.1-20080819
Version: 1.1-20080819
IMPORTANT NOTES:
 - Congratulations! Your certificate and chain have been saved at /etc
   /letsencrypt/live/demo.letsencrypt.<root domain>/fullchai
   n.pem. Your cert will expire on 2016-03-19. To obtain a new version
   of the certificate in the future, simply run Let's Encrypt again.
 - If you like Let's Encrypt, please consider supporting our work by:

   Donating to ISRG / Let's Encrypt:   https://letsencrypt.org/donate
   Donating to EFF:                    https://eff.org/donate-le
When the command completes successfully it has created the valid certificate under “/etc/letsencrypt/live” in a directory with name same as the domain name.
$ ls /etc/letsencrypt/live/demo.letsencrypt.<Root Domain>/
cert.pem  chain.pem  fullchain.pem  privkey.pem
fullchain.pem - Contains the server certificate and intermediate certificates.
privkey.pem - Contains the private key which was used to sign the certificate.
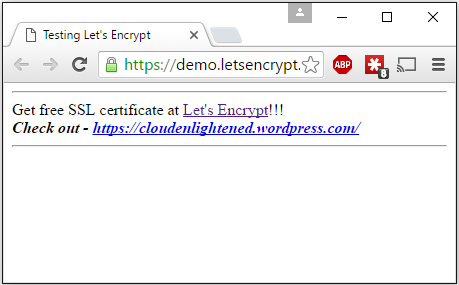
Configured Apache to point to these certificate and restarted the service.
$ cat /etc/httpd/conf.d/ssl.conf | grep ^SSLCertificate
SSLCertificateFile /etc/letsencrypt/live/demo.letsencrypt.<Root Domain>/fullchain.pem
SSLCertificateKeyFile /etc/letsencrypt/live/demo.letsencrypt.<Root Domain>/privkey.pem
Now the site has the valid signed certificate.