Since the post Using AWS CodePipeline, AWS CodeBuild, and AWS Lambda for Serverless Automated UI Testing was published, things have evolved with Chrome headless and Firefox headless being supported natively. AWS Lambda now supports container images, AWS Step Functions has added support for Map state and its integration with Lambda, and AWS Fargate has enabled automating the UI testing completely using serverless technologies.
The goal of this post is to demonstrate how to use AWS Developer Tools) to build a continuous delivery pipeline that automatically deploys a test environment and runs a UI test against it. We also explain how to build a container image which includes Chromium browser, Firefox browser, Selenium, and its dependencies, which are used in Lambda and Fargate. You can accelerate the testing by launching multiple test cases in parallel using the Map state in Step Functions.
Solution overview
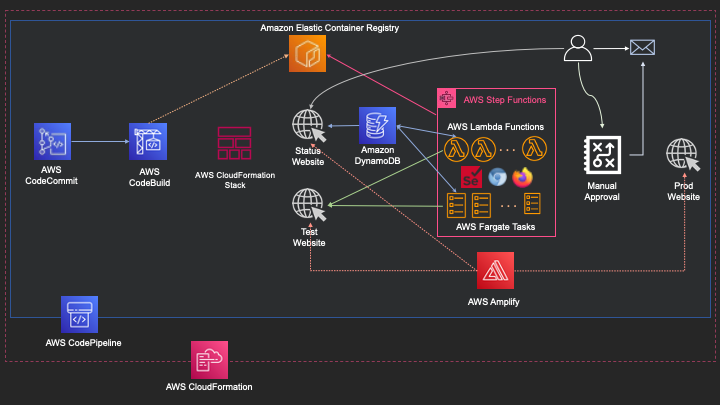
The following diagram illustrates the architecture of our solution. We have a pipeline defined in AWS CodePipeline, with AWS CodeCommit as source stage which contains all the source code in a repository, changes to the source will automatically trigger the pipeline. Followed by build stage using AWS CodeBuild to build the container image based on Dockerfile and push that image to Amazon ECR repository. Once the image has been uploaded, in Test stage it deploys the Test Website & Status Website on AWS Amplify using AWS CloudFormation, as a next action the tests will be triggered through Step Functions which will be executed on AWS Lambda or AWS Fargate. After completion of test stage, it will send an email for approval with the link to the status website. When the approver accepts the results, the website will be deployed in production.
I built a website for UI testing and a status website to display the test results, these websites will be hosted in AWS Amplify as part of the solution.
We walk through the following sections:
- A step-by-step guide of Dockerfile, which we use to create the container image
- An explanation of the various stages of a continuous delivery pipeline
- Details about the state machine created in Step Functions
- How to record the video of a test run in Lambda and Fargate
Chromium and Firefox browsers depend on certain libraries that they expect to be available and accessible in the underlying operating system. It’s much easier to use container image support by Lambda to include all the dependent packages as part of the container. Chromium provides a flag to disable shared memory (/dev/shm) so it’s possible to run them on Lambda. Firefox depends on the fallocate system call and /dev/shm. For this post, we use Fargate to run the tests on Firefox.
The resources referred to in this post, including the AWS CloudFormation template, test and status websites, AWS CodeBuild build specification files, Dockerfile, and the Python script that performs the test, are available in the serverless-ui-testing-using-selenium GitHub repository.
Prerequisites
To deploy this example solution, you should have AWS Identity and Access Management (IAM) access to use the following services:
- AWS Amplify
- AWS CodeBuild
- AWS CodeCommit
- AWS CodePipeline
- AWS CloudFormation
- Amazon DynamoDB
- Amazon Elastic Container Service (Amazon ECS)
- Amazon ECR
- AWS Key Management Service (AWS KMS)
- AWS Lambda
- Amazon Simple Notification Service (Amazon SNS)
- AWS Step Functions
You also need a Git client to clone and push the content to the repository.
Details about Dockerfile for container image
As shown in the following Dockerfile, we perform multi-stage builds to build the container image that is used in both Lambda and Fargate. The process has three stages:
- In the
lambda-basestage, we use the Python3.8 AWS base image for Lambda as the container base image to install the browsers and other dependencies. The stage includes the following steps:
a. Copyrequirements.txtandinstall-browsers.shin to the container to use later.
b. Install all the operating system level dependencies needed for Chromium and Firefox browsers.
c. Install Python dependencies including Selenium WebDriver.
d. Remove the unnecessary packages that were used only in one of the preceding steps. - In the
ffmpegstage, we use the Python3.8 AWS base image for Lambda as the container base image to build FFmpeg, which is needed to record videos:
a. Set a work directory and install the dependent libraries and necessary development tools to compile FFmpeg from source.
b. Download and compile the NASM assembler needed for compiling FFmpeg.
c. Download and compile the Yasm assembler needed for compiling FFmpeg.
d. Download and compile FFmpeg from the source. - In the final stage, we use the
lambda-baseimage built in the first stage and generate the final image needed for Lambda and Fargate:
a. Copy the compiled FFmpeg binary from the earlier stage to the/usr/bindirectory in this container.
b. Copy the application code, which includes the Lambda handlers, Fargate handlers, and other test cases, to the/var/taskdirectory.
We configure the entry point for the container in the Lambda image override configuration and in the container definition of the Amazon ECS task definition.
# Install Browser, OS dependencies and Python modules
FROM public.ecr.aws/lambda/python:3.8 as lambda-base

COPY requirements.txt /tmp/
COPY install-browsers.sh /tmp/

# Install dependencies
RUN yum install xz atk cups-libs gtk3 libXcomposite alsa-lib tar \
    libXcursor libXdamage libXext libXi libXrandr libXScrnSaver \
    libXtst pango at-spi2-atk libXt xorg-x11-server-Xvfb \
    xorg-x11-xauth dbus-glib dbus-glib-devel unzip bzip2 -y -q

# Install Browsers
RUN /usr/bin/bash /tmp/install-browsers.sh

# Install Python dependencies for function
RUN pip install --upgrade pip -q
RUN pip install -r /tmp/requirements.txt -q

# Remove not needed packages
RUN yum remove xz tar unzip bzip2 -y

# Build ffmpeg
FROM public.ecr.aws/lambda/python:3.8 as ffmpeg
WORKDIR /ffmpeg_sources
RUN yum install autoconf automake bzip2 bzip2-devel cmake libxcb libxcb-devel \
    freetype-devel gcc gcc-c++ git libtool make pkgconfig zlib-devel -y -q

# Compile NASM assembler
RUN curl -OL https://www.nasm.us/pub/nasm/releasebuilds/2.15.05/nasm-2.15.05.tar.bz2
RUN tar xjvf nasm-2.15.05.tar.bz2
RUN cd nasm-2.15.05 && sh autogen.sh && \
    ./configure --prefix="/ffmpeg_sources/ffmpeg_build" \
    --bindir="/ffmpeg_sources/bin" && \
    make && make install

# Compile Yasm assembler
RUN curl -OL https://www.tortall.net/projects/yasm/releases/yasm-1.3.0.tar.gz
RUN tar xzvf yasm-1.3.0.tar.gz
RUN cd yasm-1.3.0 && \
    ./configure --prefix="/ffmpeg_sources/ffmpeg_build" \
    --bindir="/ffmpeg_sources/bin" && \
    make && make install

# Compile FFMpeg
RUN curl -OL https://ffmpeg.org/releases/ffmpeg-snapshot.tar.bz2
RUN tar xjvf ffmpeg-snapshot.tar.bz2
RUN cd ffmpeg && \
    export PATH="/ffmpeg_sources/bin:$PATH" && \
    export PKG_CONFIG_PATH="/ffmpeg_sources/ffmpeg_build/lib/pkgconfig" && \
    ./configure \
    --prefix="/ffmpeg_sources/ffmpeg_build" \
    --pkg-config-flags="--static" \
    --extra-cflags="-I/ffmpeg_sources/ffmpeg_build/include" \
    --extra-ldflags="-L/ffmpeg_sources/ffmpeg_build/lib" \
    --extra-libs=-lpthread \
    --extra-libs=-lm \
    --enable-libxcb \
    --bindir="/ffmpeg_sources/bin" && \
    make && \
    make install

# Final image with code and dependencies
FROM lambda-base

# Copy FFMpeg binary
COPY --from=ffmpeg /ffmpeg_sources/bin/ffmpeg /usr/bin/

# # Copy function code
COPY app.py /var/task/
Continuous delivery pipeline
We create a continuous delivery pipeline to automate the testing and deployment to production based on the changes to the source repo. We create the pipeline through AWS CloudFormation with the pipeline.yaml template. This stack creates the pipeline, its dependent resources, and DynamoDB tables needed to store the details of the modules and test results.
The following screenshot illustrates our pipeline.
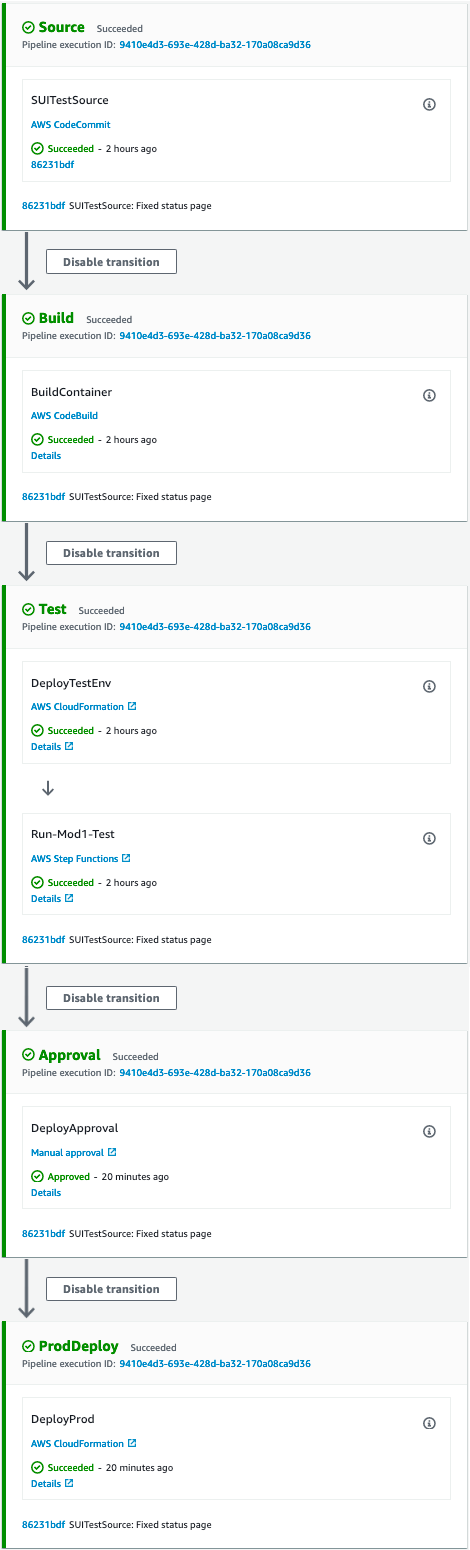
The pipeline includes the following stages:
- Source stage – Monitors for code changes in the configured CodeCommit repository and triggers the serverless UI testing pipeline in CodePipeline.
- Build stage – Builds the container image using CodeBuild, tags it appropriately using the CodeBuild run ID, and pushes it to the Amazon ECR registry.
- Test stage – This stage contains two actions:
- The first action deploys the test environment using AWS CloudFormation, which includes Lambda functions, Fargate tasks, and a Step Functions state machine to orchestrate the test run.
- After the test environment is deployed, the second action triggers the state machine, which queries the DynamoDB table for the list of tests to run and triggers all the tests in parallel using the Map state. (You can update the list of tests and test modules in the DynamoDB table with the name starting with
ModulesTable-created as part of the pipeline through the AWS Management Console or API.)
- Approval stage – When the test stage is complete, this stage sends an email notification with a link to the test results page. You can review the results and approve or reject the production deployment. If you reject the review, the pipeline stops at this stage.
- ProdDeploy stage – If the review is approved, the pipeline deploys the application in the production environment.
When the pipeline reaches the approval stage, it sends an email (see the following screenshot) to review the status of the test result and another link to the pipeline directly to approve or reject the review.
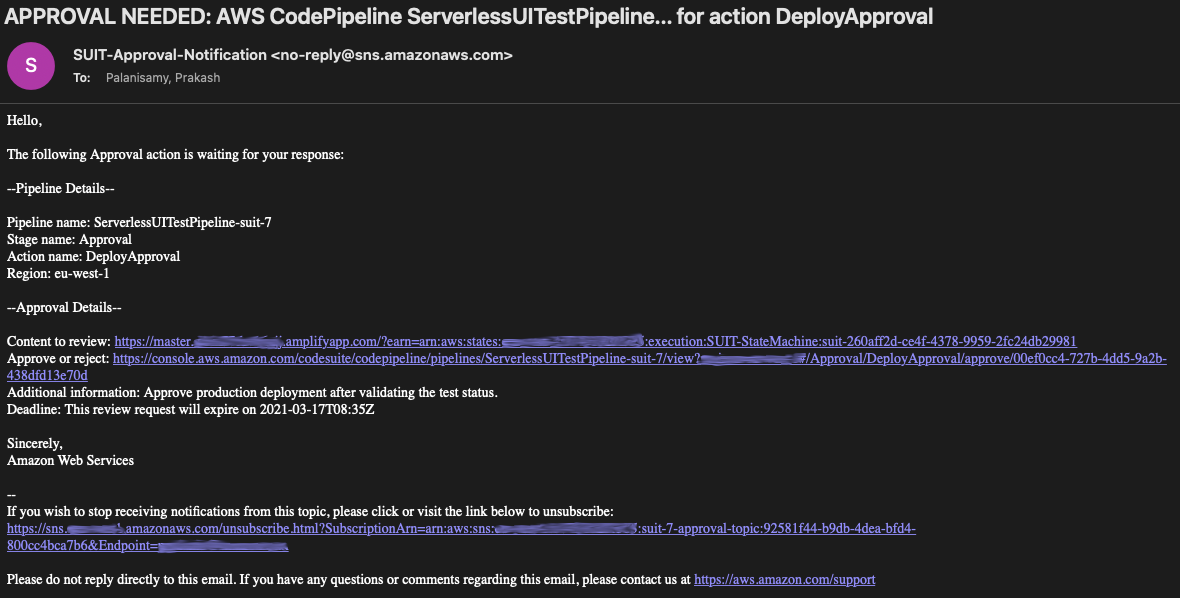
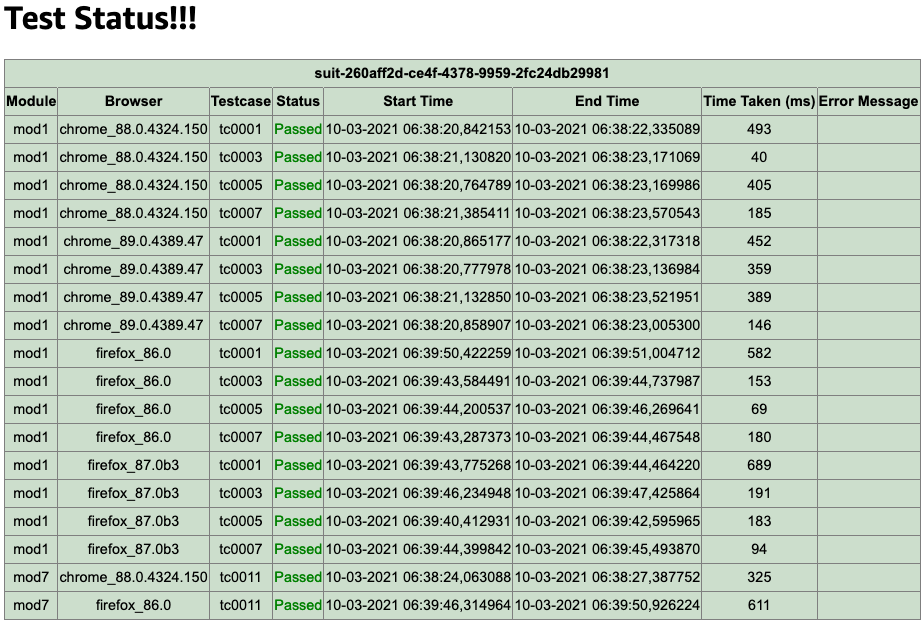
When you choose the link Content to review, you’re presented with the status page (see the following screenshot) with details including the list of test cases, run status, browser versions, time taken, and more.
Step Functions state machine
Now let’s look at the test orchestration Step Functions state machine, as shown in the following screenshot.
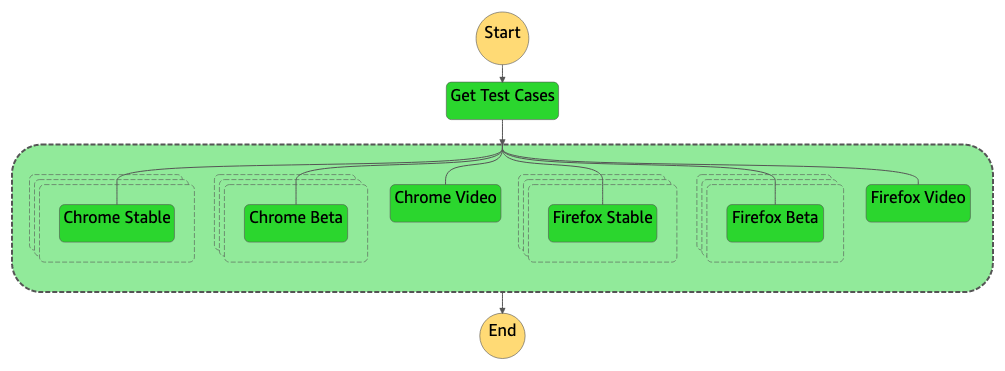
The state machine has a task state and a parallel state with multiple Map states in it:
- Task state – The DynamoDB table contains details about test cases pertaining to a certain test module. In the task state, it will get the test module as input and using that it queries the DynamoDB table to get the list of test cases, which returns an array or list of test case IDs pertaining to that specific module. These test cases will be passed as input to the next state to execute all of them in parallel.
- Parallel state – This state launches parallel test runs on Chrome Stable, Chrome Beta, Firefox Stable, and Firefox Beta browser versions, and two other runs on Chrome and Firefox to record the test run as a video (which you can use for debugging purposes if needed). Every parallel state launches a Map state based on the number of test cases obtained from the task state, which trigger a separate Lambda function or Fargate task for every test case simultaneously. For more information about the amount of parallelism you can achieve, see Lambda quotas and Amazon ECS service quotas.
Recording the test run as a video
One of the parallel states in the state machine is to record the video of the test execution. To record the test run as a video, we use headful Chrome and Firefox and need a display where the headful browser can launch. Because we can’t have a graphical display in both Lambda and Fargate, we use X virtual framebuffer (Xvfb) and PyVirtualDisplay, which is a Python wrapper for Xvfb. In this example, we set the DISPLAY environment variable to :25 in the Lambda function and Fargate container, then start the Xvfb on display :25. We use FFmpeg to listen to input on display :25 in x11grab format and write output to a file in .mp4 format. When the recording is complete, you upload it to Amazon S3 from the local file system.
Recording video might need additional compute resources and run longer than needed for only running the tests. Therefore, you can conditionally record video (rerun a failed test to record it as a video for debugging).
Clean Up To clean up the resources delete the following resources.
- CloudFormation stack with a prefix
SUIT-Prod-Stack- - CloudFormation stack that you created with
pipeline.yamltemplate. - Two S3 buckets that was created by the pipeline stack which follows the below naming convention.
- <PIPELINE_STACK_NAME>-codepipeline-artifact-<ACCOUNT_ID>-
- <PIPELINE_STACK_NAME>-test-output-<ACCOUNT_ID>-
Conclusion
In this post, I showed how you can build a container image to use in both Lambda and Fargate. We integrated UI testing as part of the continuous delivery pipeline using CodePipeline, CodeBuild, AWS CloudFormation, and Step Functions.
You can extend this approach beyond UI testing and integrate complete automated testing using AWS Developer Tools and Serverless technologies.
This was originally published at AWS DevOps Blog.